
Introduction
We conducted an online training course titled “Introduction to Linux Kernel Exploitation” between September and October 2024. The course was delivered in Portuguese. A few months before the start date, we published a series of blog posts exploiting a vulnerability on Linux kernel to give attendees a preview of the curriculum. We believe many introductory materials for Linux kernel exploitation available online are not well-suited for newcomers. They often jump directly into complex heap manipulation strategies that are difficult for beginners to grasp. Our course, however, serves as a foundational introduction to the topic even for those not intended to work as security researcher.
We do not expect attendees to have much prior experience with kernel vulnerabilities, kernel debugging, computer architecture, memory management, or the Linux ecosystem. While experience with binary exploitation is considered a plus, we do not assume that participants possess this background. The core requirements are a solid understanding of Linux, proficiency in C programming, and a foundational knowledge of x86 assembly. The training agenda is designed to provide all the necessary fundamentals for attendees to advance their studies in understanding and exploiting Linux kernel vulnerabilities.
This is why we decided to focus on a NULL pointer dereference vulnerability, even in 2025. Although this class of vulnerability receives less attention today due to the mitigations deployed in modern operating systems and processors, nearly all of the legendary vulnerability researchers we admire today had to master exploits of this nature in the past.
The training agenda, beyond exploiting vulnerabilities in the Linux kernel, also includes x86 computer architecture, segmentation, paging, debugging, and the Linux ecosystem, and we believe the training truly demonstrates how all of these topics come together in practice. To prepare for our English-language online training scheduled for next year, we have translated our series of blog posts into English to assist others interested in starting Linux kernel exploitation. If you are interested in joining our training next year, please contact us.
We will utilize a real-world Linux kernel vulnerability. We will walk through the entire exploitation process—from setting up the lab environment and triggering the exploit to maintaining system stability and, ultimately, bypassing various mitigations. By the end of this series, the reader should be able to develop an exploit that achieves root privileges on a Linux system with the primary mitigations enabled (with the exception of SMAP due to the specific vulnerability class, as we will discuss in the final post) as demonstrated in the video below.
The series is divided into four parts, as follows:
- Vulnerability and environment
- Triggering the vulnerability
- Stable vulnerability exploitation
- Modern mitigation Bypasses: SMEP and KASLR
For these blog posts, we will remain objective on specific points, explaining and contextualizing them as necessary to teach the content. This means we will focus on a single primitive to exploit this vulnerability and address one specific method of privilege escalation for a successful exploit. In the training, however, we cover several primitives and techniques that allow us to achieve the goal of compromising the system.
The vulnerability
The vulnerability we will exploit has already been patched within the Linux kernel. The fix is documented in commit 36eec020fab66 (net: sched: fix NULL pointer dereference in mq_attach). This is a NULL pointer dereference issue located in the networking subsystem. The target operating system for this exploit is Debian 12, specifically using kernel 6.1.8-1.
NOTE 1: After the system boots up, the CPU operates in a mode where it does not have direct access to physical memory. This is known as Protected Mode in 32-bit systems and Long Mode in 64-bit systems. In these modes, the CPU utilizes a feature called Paging. Consequently, all memory accesses must be automatically translated by the CPU from virtual to physical addresses.
Therefore, when the term “mapping” is used in this article, it refers to the defined relationship between a virtual address and a physical address.
While Paging is fundamental to understanding modern systems—and we cover it in depth in our training course—detailed knowledge of it is not mandatory to follow this series.
NOTE 2: NULL pointer dereference vulnerabilities are generally no longer exploitable on modern Linux distributions. Current Linux systems feature a setting enabled by default that prevents users from mapping the NULL address. Additionally, modern CPUs incorporate hardware features that make exploiting this class of vulnerability effectively impossible under standard conditions. We will discuss these mitigations in detail within the “Lab Settings” section.
We chose a NULL pointer dereference vulnerability for this blog series and training because this class of vulnerability does not require extensive knowledge of Linux kernel subsystems or dynamic kernel allocation to be understood.
It allows for the practical application of fundamental concepts, such as the address space split between user and kernel, as well as paging. By thoroughly mastering these topics, the reader will achieve a high level of comprehension regarding how an operating system functions and interacts with a modern CPU. Furthermore, this foundation enables the study of more complex subjects in the future.
These blog posts serve as a prerequisite, ensuring a better understanding of the training for readers who also plan to participate. Other types of vulnerabilities would introduce significantly greater complexity regarding the flaw itself, which could hinder the comprehension of the core concepts we aim to convey—especially for the specific target audience of this training.
The commit message that fixed the vulnerability confirms that it is a NULL pointer dereference. It also includes a kernel error message report (OOPS), providing specific details about the crash, such as the state of the registers and the stack trace:
Unable to handle kernel NULL pointer dereference at virtual address 0000000000000000
Internal error: Oops: 0000000096000006 [#1] SMP
Modules linked in:
pstate: 20000005 (nzCv daif -PAN -UAO -TCO -DIT -SSBS BTYPE=--)
pc : mq_attach+0x44/0xa0
lr : qdisc_graft+0x20c/0x5cc
sp : ffff80000e2236a0
x29: ffff80000e2236a0 x28: ffff0000c0e59d80 x27: ffff0000c0be19c0
x26: ffff0000cae3e800 x25: 0000000000000010 x24: 00000000fffffff1
x23: 0000000000000000 x22: ffff0000cae3e800 x21: ffff0000c9df4000
x20: ffff0000c9df4000 x19: 0000000000000000 x18: ffff80000a934000
x17: ffff8000f5b56000 x16: ffff80000bb08000 x15: 0000000000000000
x14: 0000000000000000 x13: 6b6b6b6b6b6b6b6b x12: 6b6b6b6b00000001
x11: 0000000000000000 x10: 0000000000000000 x9 : 0000000000000000
x8 : ffff0000c0be0730 x7 : bbbbbbbbbbbbbbbb x6 : 0000000000000008
x5 : ffff0000cae3e864 x4 : 0000000000000000 x3 : 0000000000000001
x2 : 0000000000000001 x1 : ffff8000090bc23c x0 : 0000000000000000
Call trace:
mq_attach+0x44/0xa0
qdisc_graft+0x20c/0x5cc
tc_modify_qdisc+0x1c4/0x664
rtnetlink_rcv_msg+0x354/0x440
netlink_rcv_skb+0x64/0x144
rtnetlink_rcv+0x28/0x34
netlink_unicast+0x1e8/0x2a4
netlink_sendmsg+0x308/0x4a0
sock_sendmsg+0x64/0xac
____sys_sendmsg+0x29c/0x358
___sys_sendmsg+0x90/0xd0
__sys_sendmsg+0x7c/0xd0
__arm64_sys_sendmsg+0x2c/0x38
invoke_syscall+0x54/0x114
el0_svc_common.constprop.1+0x90/0x174
do_el0_svc+0x3c/0xb0
el0_svc+0x24/0xec
el0t_64_sync_handler+0x90/0xb4
el0t_64_sync+0x174/0x178
To reach the point where we can reproduce this kernel message, we require a vulnerable environment in which to perform our tests. We will demonstrate how to set up this environment later in the series. First, let us examine the nature of a NULL pointer dereference and the specific conditions that make it possible to exploit.
NULL Pointer Dereference and Memory Layout
We typically use pointers when working with low-level programming languages such as C. Pointers are variables whose value is a memory address. This memory address, in turn, stores data of the same type as the pointer itself. In other words, an integer pointer is a variable that stores a specific memory address, and that address contains an integer value.
Pointers are widely utilized in systems programming. By default, a pointer that points to NULL is usually considered invalid. For this reason, it is standard practice to implement validations during memory allocation, as shown in the following example:
void *pointer;
...
pointer = malloc(sizeof(typeA));
if (pointer == NULL) {
    printf("[!] - Out of memory!\n");
    exit(EXIT_FAILURE);
}
ATTENTION: The NULL address is not, in fact, an inherently invalid address. It is simply unmapped by default; if it is accessed while unmapped, an exception is generated, and the operating system terminates the program. However, it can be mapped and accessed under specific circumstances, just like any other address in a process’s address space.
A while back, there were no restrictions, and any process could map the NULL address and turn it into a valid, accessible location. Nowadays, this is prohibited by default because NULL pointer dereference issues within the kernel could lead to full system compromise.
The example above illustrates a case of memory allocation where the return value is validated for a user-mode process. Its kernel-mode equivalent is shown below:
void *pointer;
...
pointer = kmalloc(sizeof(struct typeA), GFP_KERNEL);
if (pointer == NULL) {
    return NULL;
}
There are two primary differences between these code snippets:
- The dynamic memory allocation API in the Linux kernel differs significantly from the user-mode API.
- Code executing in the kernel cannot simply call
exit()to terminate execution. The kernel, once initialized, does not terminate until the machine is shut down; therefore, utilizingexit()is not an option. Instead, kernel code must typically return control to the location from which it was called.
In the Linux kernel, user-mode applications may map the NULL address for their own use due to the system’s memory layout. The range of possible addresses in a user-mode process extends from 0x0000000000000000 (NULL) up to 0x00007fffffffffff. This region is followed by non-canonical (invalid, non-addressable) addresses and finally by kernel-space addresses, which range from 0xffff800000000000 up to 0xffffffffffffffff:
          ┌─────────── 0xffffffffffffffff ───────────┐
          │                                          │
          │               Kernel space               │
          │                                          │
          ├─────────── 0xffff800000000000 ───────────┤
          │                                          │
          │              Non-canonical               │
          │                 addresses                │
          │                                          │
          ├─────────── 0x00007fffffffffff ───────────┤
          │                                          │
          │                User space                │
          │                                          │
          └─────────── 0x0000000000000000 ───────────┘
NOTE: You can find more detailed information regarding the Linux memory layout by accessing the following resource: Complete virtual memory map with 4-level page tables.
If a malicious process maps the NULL address, populates it with malicious data, and triggers the vulnerability, the code executing in kernel mode within that process’ context dereferences the pointer to the NULL address. Consequently, the kernel will operate using data controlled by the malicious process, potentially redirecting or compromising kernel code execution.
This occurs because, on architectures such as x86, the kernel and process address spaces are mapped simultaneously (as shown in the memory layout earlier). Consequently, while a user-mode process is restricted from accessing kernel memory, the reverse is not true. By design, the kernel has access to the application’s user-mode address space. Because the NULL address resides within the user-space range, it is accessible to the kernel during execution.
NOTICE: To simplify the core concepts, we stated that the kernel can access the address space of a process in user mode. In modern systems, however, specific mitigations prevent this from occurring. This is the case with SMEP (Supervisor Mode Execution Prevention) and SMAP (Supervisor Mode Access Prevention). We will discuss these features in greater depth in the final blog post of this series. For now, assume that due to the memory layout of the Linux kernel and the x86 architecture, the kernel has access to the user-mode address space.
In the x86 architecture and Linux, the kernel is mapped by default into the high-address range mentioned previously, and this mapping is consistent across all processes. However, each individual process maintains its own unique user-space mappings. While the virtual address range is the same for all processes, the addresses mapped in Process A are valid only for that process and the kernel when it is executing in the context of Process A; consequently, those same addresses are not valid for Process B, nor for the kernel when it is executing in the context of Process B.
This occurs because each process maintains its own page table, and when the kernel executes, it utilizes the page table of the current process for that execution. Because the kernel is mapped into the page tables of all processes, a modification to kernel-space addresses within one process context becomes globally visible to others. Conversely, modifications or mappings within the user-mode process are isolated; they are visible only to that specific process, its threads, and its child processes (provided the mapping configuration allows for sharing).
In short, if Process A maps a NULL address, but the NULL pointer dereference vulnerability is triggered within Process B, the address remains invalid (unmapped) because these processes have different page tables. Consequently, a page fault exception occurs, triggering a kernel OOPS and terminating Process B. Therefore, for the exploit to succeed, the kernel access must occur specifically within the context of the process that performed the mapping.
On the other hand, certain architectures and system configurations (including 32-bit Linux with the 4G/4G patch enabled) utilize a different memory layout where a total separation exists between the kernel and user-mode address spaces. In these specific cases, the address space is not shared; the kernel and the process operate in entirely distinct virtual memory environments.
Consequently, we can conclude that this vulnerability is exploitable primarily in scenarios where kernel and user-mode memory share a common address space.
How can a NULL pointer dereference compromise the system?
As previously mentioned, if a system lacks mechanisms to prohibit a user from mapping the NULL address, that address can be mapped and treated as valid. Suppose a NULL pointer dereference occurs within the kernel because a pointer was not correctly validated; if that NULL address is accessed while the code is executing in kernel mode, the kernel will inadvertently access a memory location over which the user has total control.
The most straightforward scenario for system compromise occurs when a kernel object contains a function pointer. Since this pointer is stored in memory that the user is authorized to read and write (at the NULL address), the user can modify the function address at will. Consequently, when the kernel attempts to execute that function, it leads directly to arbitrary code execution in kernel mode.
Lab Environment
To begin exploiting this vulnerability, we must establish a proper environment that allows us to test and analyze the exploit as necessary.
Since the vulnerability we are analyzing has already been patched, simply installing any recent version of the Linux kernel will not suffice for exploitation. Modern operating systems running the latest updates will certainly have the fix applied. To effectively reproduce and study this flaw, we will utilize Debian 12 running Linux kernel version 6.1.8-1.
Base System Installation
We have selected Debian 12 with kernel version 6.1.8-1 for this lab. Consequently, our first step is to install this specific environment in a virtual machine.
NOTICE: To create the virtual machine, you can utilize the hypervisor you are most familiar with, such as QEMU, VMware, VirtualBox, or any other alternative. Throughout this series, we will use QEMU with LibVirt; however, your choice of virtualization software will not significantly alter the lab procedures. Simply ensure that you perform the configuration steps correctly within your chosen environment.
Once you have downloaded the Debian 12 installation image, proceed to create the virtual machine. For this environment, configure the VM with 2GB of RAM, two vCPUs, and 50GB of storage. Additionally, ensure the virtual network is configured to provide internet access and allow your host machine to connect to the guest via SSH.
In our scenario using QEMU + LibVirt, we first create a virtual disk and then define our machine using the following commands:
$ qemu-img create -f qcow2 debian12.qcow2 50G
$ virt-install --network default --network bridge=research0 --memory 2048 --vcpus 2 --arch x86_64 --graphics vnc --noautoconsole --disk debian12.qcow2 --name debian_12 --os-variant debian12 --cdrom debian-12.6.0-amd64-DVD-1.iso
Install the system in a standard way. Consider the following points:
- Graphic Environment: A graphical environment is not necessary; a minimal, text-based installation is preferred for this lab.
- SSH Server: Remember to enable the installation of the SSH server during the software selection process.
- Credentials and Hostname: We usually configure ‘debian12’ as the hostname and ‘user’ as both the system username and password for consistency.
After installing and rebooting the machine, we can connect via SSH from the host. Upon accessing the virtual machine’s shell, we will execute a series of commands to update the system and install essential packages that will be required for our work:
# apt update
# apt upgrade -y
# apt install -y sudo gcc make vim
# usermod -a user -G sudo
# reboot
Getting the vulnerable kernel
We now have a functional virtual machine acting as our lab; however, it is not running the specific vulnerable kernel required for this exploit. Consequently, we must manually install the target kernel version: 6.1.8-1.
Debian provides a highly useful resource for this purpose: Debian Snapshots. This is a snapshot repository that archives every package version available at any given point in time. By configuring our repositories to point to a specific date and time, we can install the exact software versions that were current at that moment.
In our scenario, we will access the Linux package page archived within the Debian Snapshots. By searching through this archive, we can locate the specific version we require: 6.1.8-1. From this source, we will obtain three essential artifacts to properly set up our lab environment:
- Kernel binary for virtual machine execution: This is the actual
linux-imagepackage. It contains the vulnerable kernel we will install in the virtual machine. This is the kernel that contains the NULL pointer dereference vulnerability we will trigger. - Kernel binary with symbols for debugging: Often found in the
linux-image-dbgpackage, this contains the debug symbols (Dwarf information). Without these, when we do kernel debugging with GDB, we do not have access to the symbols; The symbols are helpful for understanding the crash. - Kernel source code: The
linux-sourcepackage provides the exact version of the source code of the vulnerable kernel. It’s good to have the source code to understand the code we are interacting with.
Source code
In this step, we will collect the specific source code used to generate the vulnerable kernel installed in our lab virtual machine. You might wonder: why do we need to do this instead of simply downloading the mainline source code from kernel.org?
The code available on kernel.org is known as the vanilla kernel or upstream kernel; it’s the official kernel developed by official developers. However, Linux distributions (distros) frequently modify this upstream code to provide better services, stability, or compatibility for their specific users.
This is precisely the case with Debian. You can inspect the specific modifications and patches maintained by the Debian kernel team in their official Git repository. To ensure our environment is accurate, we must have access to the exact source code that was compiled to generate the binary running in our virtual machine.
At the top of the Debian Snapshots page for the Linux package, you will find three distinct types of files:
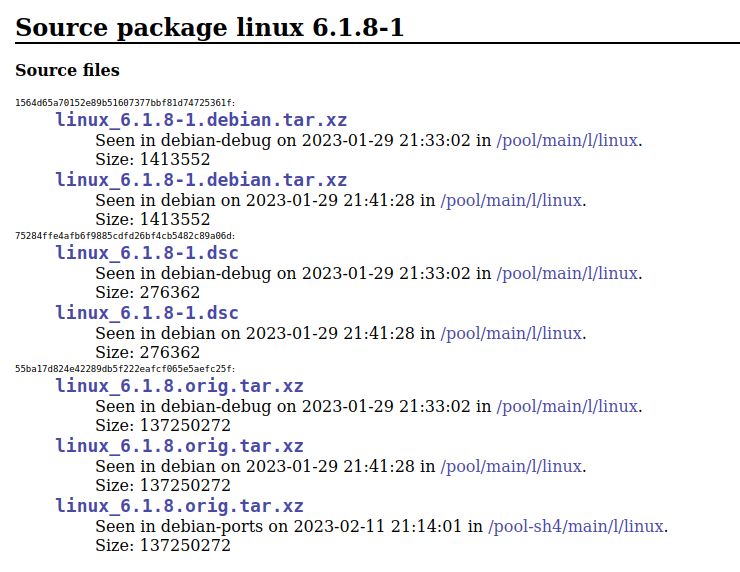
*.debian.tar.xz: This archive contains the complete set of modifications, patches, and configuration scripts that the Debian kernel team applies to the vanilla source.*.dsc: This is the Debian Source Control file. It is a signed text file containing metadata about the package, including its version, maintainer, and the checksums (hashes) used to verify the integrity of the other source files.*.orig.tar.xz: This file contains the upstream kernel source exactly as provided by the kernel.org developers, serving as the base before any Debian-specific changes are applied.
To have the proper environment for this work, we download these three files to our host machine:
$ wget http://snapshot.debian.org/archive/debian-debug/20230129T213302Z/pool/main/l/linux/linux_6.1.8-1.debian.tar.xz
$ wget http://snapshot.debian.org/archive/debian-debug/20230129T213302Z/pool/main/l/linux/linux_6.1.8-1.dsc
$ wget http://snapshot.debian.org/archive/debian-debug/20230129T213302Z/pool/main/l/linux/linux_6.1.8.orig.tar.xz
$
NOTE: The program required for this process is part of the Debian packaging suite (specifically the dpkg-dev package). While it is a Debian-native tool, it is available on many other Linux distributions. If your host OS does not support these tools, you can perform the extraction directly within the virtual machine and subsequently transfer the patched source files back to your host for analysis.
After obtaining the three necessary files, we execute the following command:
$ dpkg-source --no-check -x *.dsc
$ ls -1 linux-6.1.8
arch
block
certs
COPYING
CREDITS
crypto
debian
Documentation
drivers
fs
include
init
io_uring
ipc
Kbuild
Kconfig
kernel
lib
LICENSES
MAINTAINERS
Makefile
mm
net
README
rust
samples
scripts
security
sound
tools
usr
virt
This command generates a linux-6.1.8 directory containing the complete kernel source code, with all Debian-specific patches already applied.
Kernel binary with symbols
On the host, we will obtain the compiled kernel binary with symbols. This artifact is essential for any debugging tasks required during exploit development, as it allows us to see function names, variable types, and line numbers instead of just hexadecimal addresses.
We can locate the packages containing the compiled binaries on the Debian Snapshots page. To find the specific file equipped with debug symbols, search for the string amd64-dbg. For our target version, the package name will follow this structure:
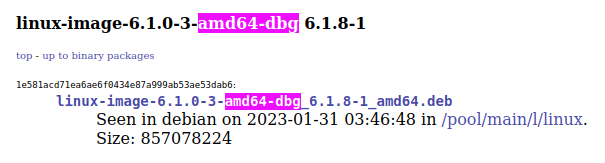
Download this file:
$ wget http://snapshot.debian.org/archive/debian/20230131T034648Z/pool/main/l/linux/linux-image-6.1.0-3-amd64-dbg_6.1.8-1_amd64.deb
$
It is a Debian binary package:
$ file linux-image-6.1.0-3-amd64-dbg_6.1.8-1_amd64.deb
linux-image-6.1.0-3-amd64-dbg_6.1.8-1_amd64.deb: Debian binary package (format 2.0), with control.tar.xz , data compression xz
$
We can use the command ‘ar‘ to extract the files from the package:
$ ar x linux-image-6.1.0-3-amd64-dbg_6.1.8-1_amd64.deb
$ ls
control.tar.xz  data.tar.xz  debian-binary  linux-image-6.1.0-3-amd64-dbg_6.1.8-1_amd64.deb
$
Three files are contained within the .deb package. The one essential to our project is data.tar.xz, as it contains the uncompressed kernel binary (vmlinux) equipped with the debug symbols we need. Therefore, we extract the contents of this file to access the binary:
$ tar xvf data.tar.xz
$ ls usr/lib/debug/
boot  lib  vmlinux-6.1.0-3-amd64
$
We will use the binary vmlinux-6.1.0-5-amd64 (or the specific version extracted from your package). Copy this file into the root of your kernel source code directory and rename it simply to vmlinux:
$ cp usr/lib/debug/vmlinux-6.1.0-3-amd64 linux-6.1.8/vmlinux
$ cd linux-6.1.8
We will now enter this directory to facilitate easier access to the source code, as it already contains the binary with the debug symbols. From this point forward, we will use this directory as our primary workspace for analysis and exploit development.
Debian package for the running kernel
With the host machine fully prepared—containing both the source code and the vmlinux binary with debug symbols—we must now install the corresponding kernel version within the lab virtual machine. This ensures that the execution environment inside the VM is an identical match to the analysis environment on the host.
Once again, you can download the execution binary from the Debian Snapshot page. It is located near the debug symbols file; search for amd64-unsigned to find the specific .deb file. For our target version, the filename will look like this:

Access the virtual machine via SSH and download the kernel package directly into the guest environment. This ensures the .deb file is ready for local installation.
user@debian12:~$ wget http://snapshot.debian.org/archive/debian/20230131T034648Z/pool/main/l/linux/linux-image-6.1.0-3-amd64-unsigned_6.1.8-1_amd64.deb
user@debian12:~$
After downloading the package to your virtual machine, use the dpkg tool to perform the installation. This command will unpack the kernel, set up the necessary modules, and begin the process of integrating it into the system’s boot sequence.
user@debian12:~$ sudo dpkg -i linux-image-6.1.0-3-amd64-unsigned_6.1.8-1_amd64.deb
[sudo] password for user:
Selecting previously unselected package linux-image-6.1.0-3-amd64-unsigned.
(Reading database ... 41494 files and directories currently installed.)
Preparing to unpack linux-image-6.1.0-3-amd64-unsigned_6.1.8-1_amd64.deb ...
Unpacking linux-image-6.1.0-3-amd64-unsigned (6.1.8-1) ...
Setting up linux-image-6.1.0-3-amd64-unsigned (6.1.8-1) ...
I: /vmlinuz.old is now a symlink to boot/vmlinuz-6.1.0-23-amd64
I: /initrd.img.old is now a symlink to boot/initrd.img-6.1.0-23-amd64
I: /vmlinuz is now a symlink to boot/vmlinuz-6.1.0-3-amd64
I: /initrd.img is now a symlink to boot/initrd.img-6.1.0-3-amd64
/etc/kernel/postinst.d/initramfs-tools:
update-initramfs: Generating /boot/initrd.img-6.1.0-3-amd64
/etc/kernel/postinst.d/zz-update-grub:
Generating grub configuration file ...
Found linux image: /boot/vmlinuz-6.1.0-23-amd64
Found initrd image: /boot/initrd.img-6.1.0-23-amd64
Found linux image: /boot/vmlinuz-6.1.0-22-amd64
Found initrd image: /boot/initrd.img-6.1.0-22-amd64
Found linux image: /boot/vmlinuz-6.1.0-3-amd64
Found initrd image: /boot/initrd.img-6.1.0-3-amd64
Warning: os-prober will not be executed to detect other bootable partitions.
Systems on them will not be added to the GRUB boot configuration.
Check GRUB_DISABLE_OS_PROBER documentation entry.
done
user@debian12:~$
After the installation completes, verify the contents of the /boot directory. You are looking for the files associated with version 6.1.0-5-amd64. Specifically, you should see the kernel image (vmlinuz), the initial RAM disk (initrd), and the configuration file.
user@debian12:~$ ls -1 /boot/vmlinuz*
/boot/vmlinuz-6.1.0-22-amd64
/boot/vmlinuz-6.1.0-23-amd64
/boot/vmlinuz-6.1.0-3-amd64
user@debian12:~$
GRUB Configuration
After installing the correct version of the kernel, restart the virtual machine and choose the specific version you want during the GRUB boot screen so the system will start up with the intended kernel version.
However, this manual method is impractical and prone to error. Since this lab focuses on exploiting the vulnerability specifically in this version, we will configure GRUB to select it by default.
To configure this, we need to identify the exact position of the boot options where the desired version appears. There might be several kernels available. Consequently, we will inspect the GRUB configuration file to determine the specific order in which our target kernel version is listed:
user@debian12:~$ sudo grep 'Debian' /boot/grub/grub.cfg
menuentry 'Debian GNU/Linux' --class debian --class gnu-linux --class gnu --class os $menuentry_id_option 'gnulinux-simple-91cfce81-5ed9-46ab-a77e-3b464dbddff2' {
submenu 'Advanced options for Debian GNU/Linux' $menuentry_id_option 'gnulinux-advanced-91cfce81-5ed9-46ab-a77e-3b464dbddff2' {
        menuentry 'Debian GNU/Linux, with Linux 6.1.0-23-amd64' --class debian --class gnu-linux --class gnu --class os $menuentry_id_option 'gnulinux-6.1.0-23-amd64-advanced-91cfce81-5ed9-46ab-a77e-3b464dbddff2' {
        menuentry 'Debian GNU/Linux, with Linux 6.1.0-23-amd64 (recovery mode)' --class debian --class gnu-linux --class gnu --class os $menuentry_id_option 'gnulinux-6.1.0-23-amd64-recovery-91cfce81-5ed9-46ab-a77e-3b464dbddff2' {
        menuentry 'Debian GNU/Linux, with Linux 6.1.0-22-amd64' --class debian --class gnu-linux --class gnu --class os $menuentry_id_option 'gnulinux-6.1.0-22-amd64-advanced-91cfce81-5ed9-46ab-a77e-3b464dbddff2' {
        menuentry 'Debian GNU/Linux, with Linux 6.1.0-22-amd64 (recovery mode)' --class debian --class gnu-linux --class gnu --class os $menuentry_id_option 'gnulinux-6.1.0-22-amd64-recovery-91cfce81-5ed9-46ab-a77e-3b464dbddff2' {
        menuentry 'Debian GNU/Linux, with Linux 6.1.0-3-amd64' --class debian --class gnu-linux --class gnu --class os $menuentry_id_option 'gnulinux-6.1.0-3-amd64-advanced-91cfce81-5ed9-46ab-a77e-3b464dbddff2' {
        menuentry 'Debian GNU/Linux, with Linux 6.1.0-3-amd64 (recovery mode)' --class debian --class gnu-linux --class gnu --class os $menuentry_id_option 'gnulinux-6.1.0-3-amd64-recovery-91cfce81-5ed9-46ab-a77e-3b464dbddff2' {
We can see that the target kernel is the fifth item within the submenu. Given this hierarchy, we will set 1>4 as the default in GRUB. To do this, open the file /etc/default/grub and update the GRUB_DEFAULT configuration. Here is how the relevant section should look in our case:
user@debian12:~$ grep GRUB_DEFAULT /etc/default/grub
GRUB_DEFAULT="1>4"
user@debian12:~$
After saving your changes to the default file, rebuild the GRUB configuration file by executing the following command:
user@debian12:~$ sudo grub-mkconfig -o /boot/grub/grub.cfg
Generating grub configuration file ...
Found linux image: /boot/vmlinuz-6.1.0-23-amd64
Found initrd image: /boot/initrd.img-6.1.0-23-amd64
Found linux image: /boot/vmlinuz-6.1.0-22-amd64
Found initrd image: /boot/initrd.img-6.1.0-22-amd64
Found linux image: /boot/vmlinuz-6.1.0-3-amd64
Found initrd image: /boot/initrd.img-6.1.0-3-amd64
Warning: os-prober will not be executed to detect other bootable partitions.
Systems on them will not be added to the GRUB boot configuration.
Check GRUB_DISABLE_OS_PROBER documentation entry.
done
user@debian12:~$
Then, restart the virtual machine. When you access it, check if the desired kernel is running by using the following command:
user@debian12:~$ uname -r
6.1.0-3-amd64
user@debian12:~$
At this moment, we already have almost everything we need for our lab. Let’s finish configuring the virtual machine to accept incoming connections from the debugger and address other fundamental issues required during the analysis.
Configuration for debugging
The virtual machine is already configured to run the kernel we need for the lab. Also, we have the source code and the binary with symbols on the host machine. The next step is to bridge these two points: the virtual machine and the host machine’s debugger.
Connecting with GDB
To debug the kernel, it is essential to have the power to pause the execution of the virtual machine, analyze what is being executed, and inspect the state of the registers and memory. For those who already have some familiarity with binary exploitation or development in low-level or compiled languages, you likely already know that this is the fundamental role of a debugger.
The debugger we will use is GDB. Therefore, ensure that it is installed and properly configured on your host machine.
When using GDB to debug a user-mode application, we need to specify the binary to be executed by GDB or identify a running process for GDB to attach to and capture the execution.
This is similar to the kernel but with some peculiarities for a better experience. We also need to provide a binary for GDB to analyze (the vmlinux file with symbols we have already obtained). In addition, we need to specify a running machine that GDB can interact with—allowing us to perform actions such as pausing, inspecting, and resuming execution.
The component responsible for providing these functionalities is the hypervisor you are using, whose function is to support the execution of virtual machines. Since we are writing these posts with QEMU + Libvirt, we will approach how it is performed with that stack and then how it is done in VMware. Other hypervisors, such as VirtualBox, may also allow kernel debugging, but in those cases, you will need to check how to configure them specifically.
QEMU + LibVirt
In the case of QEMU with Libvirt, we need to execute the following command:
$ virt-xml debian_12 --edit --confirm
        --qemu-commandline '-gdb tcp:localhost:1234'
This will cause Libvirt to enable debug access for your virtual machine. Before applying this configuration, you must power off the virtual machine and then perform the following:
$ virsh destroy debian_12
$ virsh start debian_12
After that, you should be able to execute GDB and connect to the machine. Verify the connection by performing the following test (certify the connection is allowed by firewall):
$ gdb vmlinux -q
Reading symbols from vmlinux...
(gdb) target remote :1234
This way, you will realize the machine is paused. If you open the console or try to connect via SSH, the machine does not respond. Then, return to GDB and execute the command continue (or simply c). This will resume the machine’s execution, and the SSH connection will successfully establish.
(gdb) continue
Continuing.
After completing these tests, press Control+C in GDB to interrupt the session, type detach to disconnect from the remote machine, and then quit to exit GDB, as we will not need it for the next phase.
VMware
For the VMware hypervisor, the following configuration must be added to the virtual machine’s .vmx file. This must be done with the virtual machine powered off. When you start the virtual machine again, port 8864 will be open on the host, allowing GDB to connect to the guest.
debugStub.listen.guest64 = "TRUE"
debugStub.port.guest64 = "8864"
$ gdb vmlinux -q
Reading symbols from vmlinux...
(gdb) target remote :8864Now, we will implement two configurations that will assist us during the analysis:
- Create helper scripts for kernel GDB
- Remove specific security mitigations for the lab
GDB python script for Linux kernel debugging
There is an auxiliary script within the Linux kernel source code that simplify certain activities related to kernel debugging.
To configure this scripts on your host machine, you will have to take specific actions. In the directory where you downloaded the source code, as mentioned earlier, execute the following steps:
- Copy the configuration file used by Debian (remember: it is essential to have a coherent environment between the source code and the binary being executed):
$ scp debian12:/boot/config-6.1.0-3-amd64 .config- Enable the option to generate the GDB scripts by modifying your kernel configuration:
$ echo CONFIG_GDB_SCRIPTS=y >> .config- Read the kernel configuration that we modified in the last step to synchronize the build environment:
$ make olddefconfig- Generate the helper GDB scripts by executing the dedicated build target within your kernel source directory:
$ make scripts_gdbAfter performing these steps, you should see the file vmlinux-gdb.py created in the source code root:
$ ls vmlinux-*
vmlinux-gdb.py
Usually, only the command make scripts_gdb is enough considering the directory already contains a configuration file (.config).
To confirm it works, open GDB with your vmlinux in that directory and run the command apropos lx. If you see several commands like the output below, then the scripts were correctly generated. These GDB commands are implemented by the Python scripts aforementioned.
$ gdb vmlinux -q
Reading symbols from vmlinux...
(gdb) apropos lx
function lx_clk_core_lookup -- Find struct clk_core by name
function lx_current -- Return current task.
function lx_device_find_by_bus_name -- Find struct device by bus and name (both strings)
function lx_device_find_by_class_name -- Find struct device by class and name (both strings)
function lx_module -- Find module by name and return the module variable.
function lx_per_cpu -- Return per-cpu variable.
function lx_rb_first -- Lookup and return a node from an RBTree
function lx_rb_last -- Lookup and return a node from an RBTree.
function lx_rb_next -- Lookup and return a node from an RBTree.
function lx_rb_prev -- Lookup and return a node from an RBTree.
function lx_task_by_pid -- Find Linux task by PID and return the task_struct variable.
function lx_thread_info -- Calculate Linux thread_info from task variable.
function lx_thread_info_by_pid -- Calculate Linux thread_info from task variable found by pid
lx-clk-summary -- Print clk tree summary
lx-cmdline -- Report the Linux Commandline used in the current kernel.
lx-configdump -- Output kernel config to the filename specified as the command
lx-cpus -- List CPU status arrays
lx-device-list-bus -- Print devices on a bus (or all buses if not specified)
lx-device-list-class -- Print devices in a class (or all classes if not specified)
lx-device-list-tree -- Print a device and its children recursively
lx-dmesg -- Print Linux kernel log buffer.
lx-fdtdump -- Output Flattened Device Tree header and dump FDT blob to the filename
lx-genpd-summary -- Print genpd summary
lx-iomem -- Identify the IO memory resource locations defined by the kernel
lx-ioports -- Identify the IO port resource locations defined by the kernel
lx-list-check -- Verify a list consistency
lx-lsmod -- List currently loaded modules.
lx-mounts -- Report the VFS mounts of the current process namespace.
lx-ps -- Dump Linux tasks.
lx-symbols -- (Re-)load symbols of Linux kernel and currently loaded modules.
lx-timerlist -- Print /proc/timer_list
lx-version -- Report the Linux Version of the current kernel.
After this stage, we complete the host-side configuration. However, we must adjust the virtual machine settings before starting the tests.
Disabling mitigations
By default, the Linux kernel enables several modern mitigations that make it harder to exploit vulnerabilities, provided the underlying CPU supports them. In our lab scenario, some of them interfere with our study. They are:
- KASLR
- SMEP
- SMAP
- KPTI
To begin the analysis, we will turn off these mitigations.
NOTE: As mentioned earlier, throughout this series, we will bypass several of these mitigations. In the final post, we will re-enable them (with the exception of SMAP) and focus on maintaining exploit stability while the protections are active.
The most practical way to turn off these settings is to modify GRUB so that, at boot time, it instructs the Linux kernel to disable the mitigations. We will accomplish this by editing the GRUB configuration file, /etc/default/grub, once again.
In this file, we edit the option GRUB_CMDLINE_LINUX, adding clearcpuid=smep,smap nokaslr nopti. You can run the following command to apply this configuration:
user@debian12:~$ sudo sed -i -E 's/GRUB_CMDLINE_LINUX="(.*)"/GRUB_CMDLINE_LINUX="1 clearcpuid=smep,smap nokaslr nopti"/' /etc/default/grub
user@debian12:~$
To confirm the modification happens accordingly, run the following command:
user@debian12:~$ grep -w GRUB_CMDLINE_LINUX /etc/default/grub
GRUB_CMDLINE_LINUX=" clearcpuid=smep,smap nokaslr nopti"
user@debian12:~$
After that, we should configure the GRUB and restart the virtual machine:
user@debian12:~$ sudo grub-mkconfig -o /boot/grub/grub.cfg
user@debian12:~$ sudo reboot
A way to confirm that it is working is to look at the content of the file /proc/cmdline after the boot:
user@debian12:~$ cat /proc/cmdline
BOOT_IMAGE=/boot/vmlinuz-6.1.0-3-amd64 root=UUID=91cfce81-5ed9-46ab-a77e-3b464dbddff2 ro clearcpuid=smep,smap nokaslr nopti quiet
user@debian12:~$
Notice the configuration we added is shown as present in the kernel command line.
Now, with the virtual machine set up for a debugging session, let’s connect GDB to it:
$ gdb vmlinux -q
Reading symbols from vmlinux...
(gdb) target remote :1234
Remote debugging using :1234
0xffffffff81a2972b in native_safe_halt () at arch/x86/include/asm/irqflags.h:52
52      }
=> 0xffffffff81a2972b <native_safe_halt+11>:    c3                      ret
   0xffffffff81a2972c <native_safe_halt+12>:    cc                      int3
   0xffffffff81a2972d <native_safe_halt+13>:    cc                      int3
   0xffffffff81a2972e <native_safe_halt+14>:    cc                      int3
   0xffffffff81a2972f <native_safe_halt+15>:    cc                      int3
Since there is no randomization of addresses (KASLR is disabled), the symbols that GDB has access to (which are in vmlinux) match the addresses in the running machine’s memory exactly. Thus, notice that GDB can correctly display that the function that stopped the machine is native_safe_halt().
Lab settings
In the section about the vulnerability we will exploit in this series, we commented that the NULL pointer dereference class of vulnerabilities is no longer exploitable by default on most Linux distributions.
We also explained that exploiting the NULL pointer dereference vulnerability is possible because user-mode processes can map the NULL memory address. We further clarify that this mapping will be visible to the kernel running in the context of this process, due to the sharing of address space between user processes and the kernel. Thus, with this type of vulnerability, the kernel will access the address and use the content that the user-mode process can handle.
One of the mitigations currently preventing NULL pointer dereference flaws from being exploited is blocking user-mode applications from mapping the NULL address. This configuration is managed by the sysctl vm.mmap_min_addr, which defines the minimum address that a process can map. The vm.mmap_min_addr sysctl specifically prohibits mapping address 0 while typically allowing mappings on the pages directly above that threshold.
In some cases, Linux Security Modules (LSMs) such as SELinux may forbid the mapping even if the sysctl allows it. However, LSMs cannot forbid all cases of NULL + offset. The focus of this article is on NULL addresses. Still, the same applies to NULL + offset addresses or when the kernel accesses any address in the user address space unexpectedly, characterizing a vulnerability.
Since sysctl and LSM settings are not robust enough, processor mitigations such as SMEP and SMAP block execution and access to user pages when in kernel mode (except in specific cases). The kernel will never need to execute user code in a typical scenario, but it will always need to read and write to user addresses for the system to run correctly; these mitigations make NULL pointer dereference completely uninteresting for system compromise.
We will remove the limitation imposed by the vm.mmap_min_addr sysctl to make the vulnerability exploitable. We do this by adding the following configuration in the /etc/sysctl.conf file and restarting the virtual machine for the configuration to take effect:
user@debian12:~$ echo vm.mmap_min_addr=0 | sudo tee -a /etc/sysctl.conf
user@debian12:~$ tail -n1 /etc/sysctl.conf
vm.mmap_min_addr=0
user@debian12:~$ sudo sysctl vm.mmap_min_addr
vm.mmap_min_addr = 0
user@debian12:~$
NOTE: We chose to use a NULL pointer dereference vulnerability to explain some kernel exploitation concepts, as this is the training proposal. It allows us to focus our efforts on points related to kernel exploitation rather than issues related to the vulnerability itself. That is why we need to perform this type of configuration.
Next steps
We have finished the first post in the series. At this point, it is expected that you know the vulnerability we will exploit, why it happens, and how it can be exploited. In addition, we have set up the lab environment, which will allow us to perform all the necessary analyses to exploit this vulnerability.
In the following posts, we will move forward in exploiting the vulnerability.
- Post 2: We will trigger the vulnerability with our code, causing a system crash (the “Kernel Oops”).
- Post 3: We will exploit the vulnerability and achieve a shell with root privileges. We will also focus on keeping the system stable after the exploit.
- Final Post: We will re-enable the mitigations we turned off and attempt to bypass them, making the lab closer to a real-world environment.
References
In case you wish additional materials on the topics covered in this post, we recommend the following:
- A Guide to Kernel Exploitation – Enrico Perla e Massimiliano Oldani
- Understanding the Linux Kernel – Daniel P. Bovet e Marco Cesati
- Understanding the Linux Virtual Memory Manager – Mel Gorman
- Intel and AMD manuals
- Attacking the Core : Kernel Exploiting Notes
- Issue 1792: Linux: virtual address 0 is mappable via privileged write() to /proc/*/mem
For more information about our upcoming Introduction to Linux Kernel Exploitation training, visit the page below.
Introduction to Linux Kernel Exploitation – September 2027
https://allelesecurity.com/introduction-to-linux-kernel-exploitation-september-2027/